

How to Design and Build in DoGA, V.06
Ever had the desire to make your own space ships - or even other vehicles or vessels - but were afraid to try? Well, fear no longer!
This thread is here to both show you how using DoGa L1 - L3 and answer any questions you might have. It is a work in progress though, so feel free to point out areas that you think could use improvement, more explanation, or more illustration. Note that this guide should work for both L1 and L3; L1 is free, but is limited to the included textures and has some grayed-out options. For more on DoGa see the First Question.
First Question: What is DoGa?
DoGa is a freeware/shareware 3D Modeling program for Windows* that can be thought of as a virtual LEGO set. It allows the user to build models using a number of pre-made parts that can then be combined in essentially infinite different ways. Those parts can be stretched, shrunk, grown, duplicated, and mirrored. They can also be layered over and through one another. Different Attributes can then be applied to those parts to give them different textures or allow for different visual effects, such as glows or transparencies. The free version - L1 - covers most of these features while L2 and L3 have more advanced options with L3 being capable of rendering fully animated scenes using multi-jointed models. While it is not as advanced as Maya or 3DSMax or the other top-end 3D modeling packages, it is simple to use, very small (30mb) and can produce designs of a quality that one might find in-game inside many current video games with enough skill and patience. As with most things in life, you get out of DoGa what you put into it so this guide will hopefully assist in getting more out of it. As near as I can tell, DoGa-L3 is now Free; There's no reason to use L1 if you can get L3.
Where can you get it? Official Download Page or My Own Install and Custom Parts.
Note that if you select the High Resolution Background installation, you'll also need to go to the L1 download link and grab DOGAL_701_BG_SETUP.EXE (or DLBG_210.EXE) on the DOGA-L1 download page.
*I've talked to people who've been able to get it to work under WINE (Linux) and the Mac-equivalent Windows Emulator. As DoGA works fine under Windows 95+ it seems reasonable that an up-to-date Windows emulator should be able to run it. A useful note is that the .exe file is just an extractor - once you have the files extracted you can move them to another system/drive/whatever without going through the setup.
Second Question: The (Very) Basics
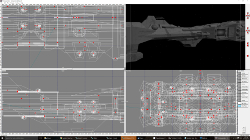
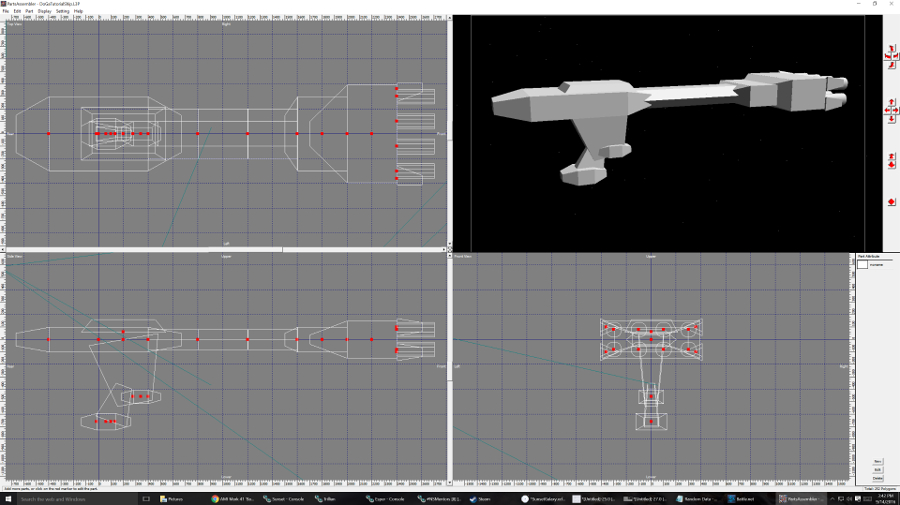
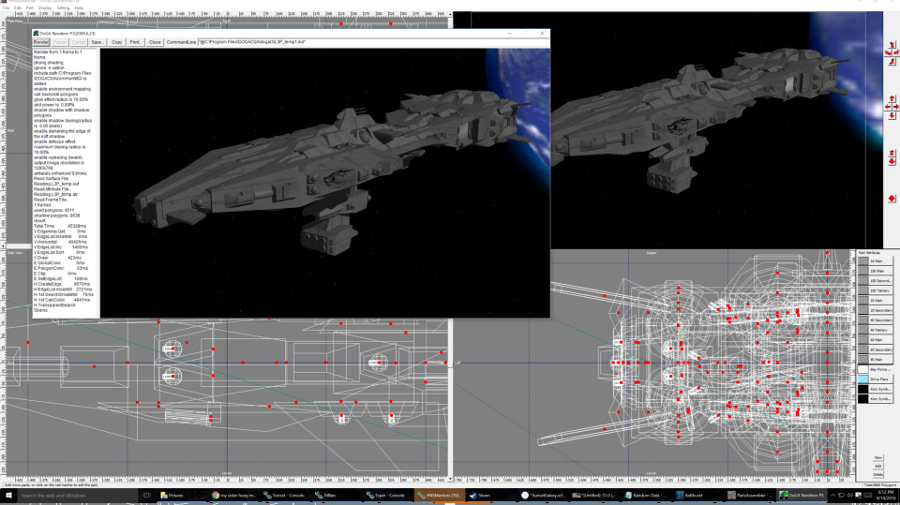
Once you open DoGa, you'll be presented with four different windows similar to those shown in the screenshots below. These are different views of the model in progress; Three Grid Views with an X, Y, or Z-axis view presented as a point-and-line rendering and a fourth that shows a real-time low-resolution rendering of the model. The scroll bars will allow you to move each of the three Grid Views around as well as manipulate parts and the fourth will allow you to view the entire or parts of the model from different angles using the controls on the right. Additionally, you can scroll and zoom inside the Grid Views by Right-clicking and holding and by using the mouse wheel, respectively. Select parts by Left-clicking the red box at the center of the part, and marque select by left-clicking and dragging. When you have a part selected, you can manipulate it using the Green or Blue Boxes shown in the Grid View; Green rotates the part, Blue stretches the part, and Red moves the part. Additionally, holding Alt will allow the part to rotate or stretch freely and ignore the sizing restrictions (Settings > Various Fitting Units...) or grid restrictions. Holding Ctrl while dragging the Blue box will force the part to stretch uniformly across all three axis. Shift+Left Click will let you multi-select specific parts; You'll need to click on or near the Red Box. Shift+Left Click also works in the Rendering Window and is, for overlapping or small parts, often the easier way to select multiple parts.
You can also use the keyboard; this is often useful for careful positioning of parts once they are 'close enough' using the mouse. This is dependent on the angle of the camera in the 3D view (Upper Right Window) and thus for ease of use it is best to make sure you've got the camera oriented more or less along the specific axis you don't want to use, as well as have the part visible in the 2D window on the plain that you want to make those adjustments across. For example if you are looking at your modeled side-on - that is, with the Z axis and the Y axis forming a '+' on the screen - having the part centered in the Lower Left window will show where it is moving. Holding Ctrl and pressing an Arrow Key will move the part as in the previous, but it will move it exactly 1 increment while the previous will move it a 'Grid Fitting Unit', which can be any user-specified amount. Holding Alt and pressing an Arrow Key will instead scale the part along the part's original Z or Y Axis. Note that the part's original axis may not be the same as how it is currently facing so check your work!
To add a part and see these functions use the 'Part > Add Part...' Menu.
In the lower right corner you'll see a vertical bar labeled 'Part Attribute'; This is where you'll create and manipulate Attributes using the buttons at the bottom and the internal Attribute dialog box. Part Attributes and various ways to manipulate and use them could be worthy of its own lengthy tutorial but we'll cover the basics in Step 3. For now, just take a look around and familiarize yourself with the interface.
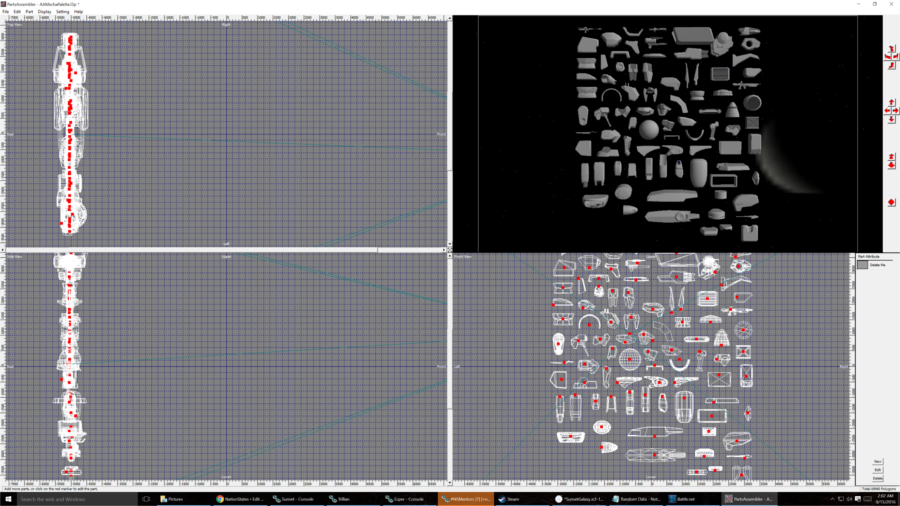
Parts and Custom Parts: The downloaded version comes with a lot of parts, enough to make any number of different designs, but they are typically low-polygon and often have pre-set features such as blue windows or yellow glowing sections. Just as with LEGO you can still make a huge number of good looking models using only these parts; in fact for the demonstration I'll be only using parts from the Basis 1-4 sub-sections. However there are a huge number of custom parts out there for the advanced user. I have collected many of these into a .zip file as well as the parts that I have made myself over the years and this file is available above.
- Making Your Own, Steps 1-10...
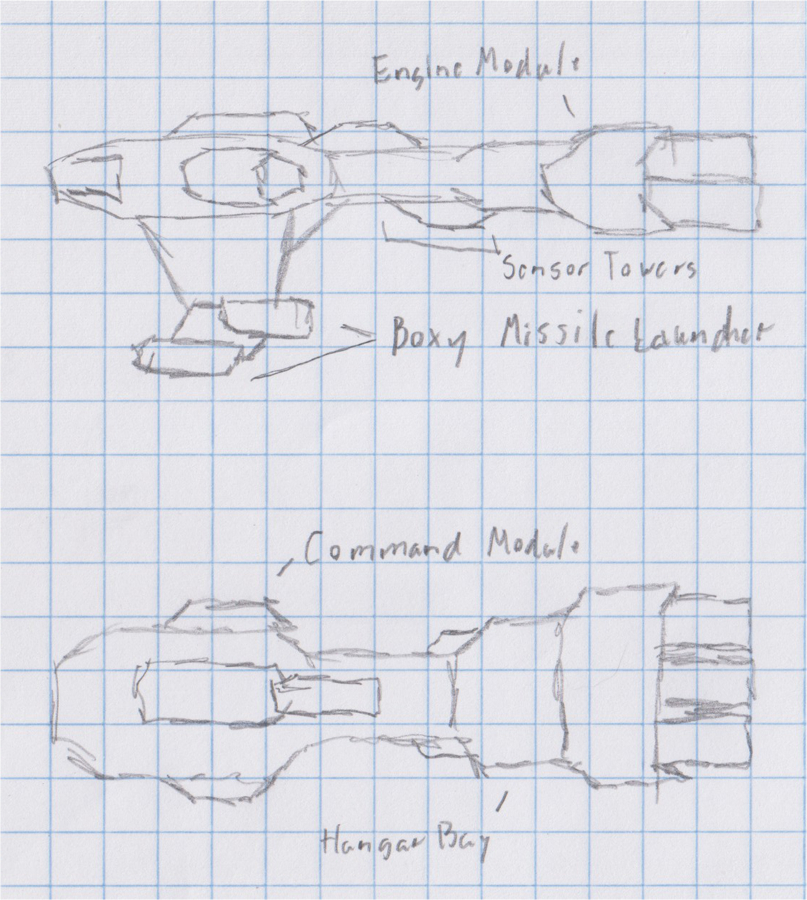
Step 1: The Rough Sketch
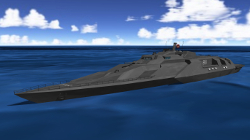
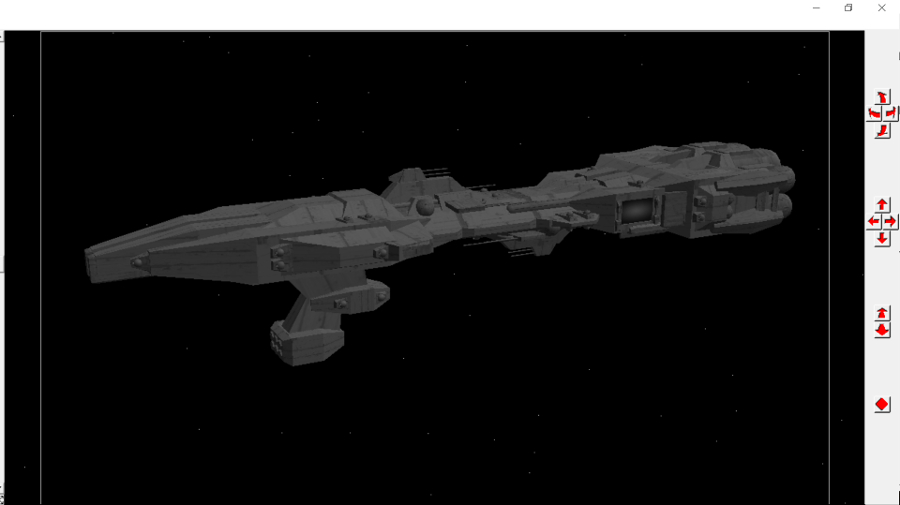
First, sketch your design out on paper. Paper and pencil is a lot faster and can be erased and modified far more readily than DoGa can and a quick sketch can save you hours of re-working the design later. I prefer graph paper since that gives me a guide that I can then translate onto DoGa's grid spacing. I also suggest at least two different views of the potential design. This helps establish a feeling for the depth and weight of the model; Thin or thick, spindly or hefty. For the example I'll be working on a warship for an alien species that appears in some of my current story lines. Their ships tend towards the 'Clunky' end of the Clunk-Sleek spectrum and so I went with a design that is something of a mix of the Corellian Corvette and the Nebulon-B Frigate. With only the standard parts DoGa lends itself better to a Clunky design aesthetic but there are plenty of custom parts that can push towards the Sleek.
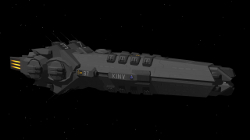
As you sketch, you should start to consider the various components of the design in question. You don't have to include all of them, but I have occasionally found for a complex model that it helps to write them down so that I don't forget to include them in the finished model. Weapons, sensors, communications gear, flags, unit insignia, and even specifics are all good to keep in mind. In this example the aliens rely on massive nuclear-warhead missiles as their primary weapon and so I included a huge box launcher for them hanging below the command module. This would reduce the dangers of a direct hit to the launcher destroying the whole craft; The same reason is used for somewhat isolating the command module from the engine module by means of the neck. You don't nessecarily need to get into the technical details of the how and why but as with all things establishing the story of the design can help it come to life especially when used in the story-based medium of NationStates forum roleplay.
Step 2: Bold Strokes
Start with the most basic shape for your new design. In this example I'm also going to be using nothing but Basic parts (Found under the 'Part > Add Part... > Basis 1-4' menu) in order to illustrate the concept of building up from a basic design to one that is more complex. Start by roughly matching your paper design. At this point the parts don't matter as much as the layout and getting the general proportions right. Some will be replaced when the detailed construction begins, others won't, but shape matters more at this point. In this instance I'm purposefully limiting the Part selection but don't be afraid to just make something fit either - or to try something new. Because you can stretch and rotate and fit Parts through other Parts you might put down a Part at this stage that could completely change or even just suggest the future aesthetic for the design.
Step 3: Attributing Your Work
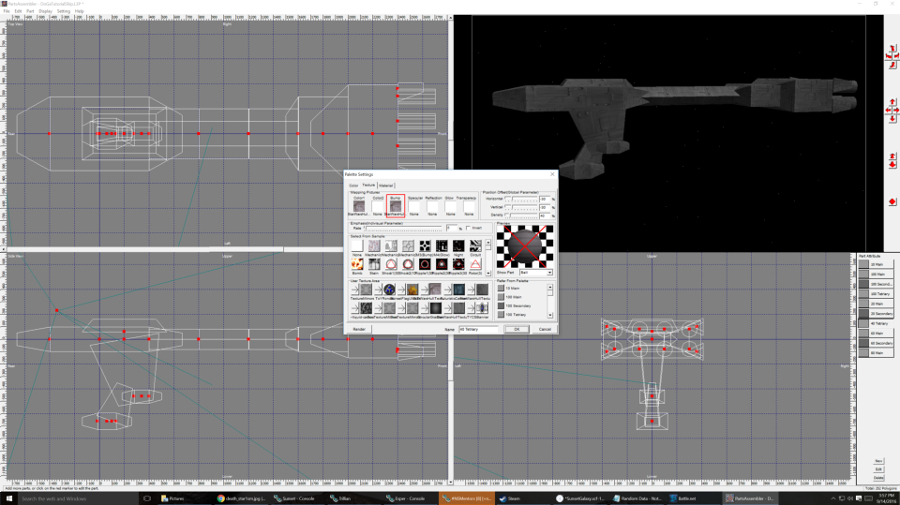
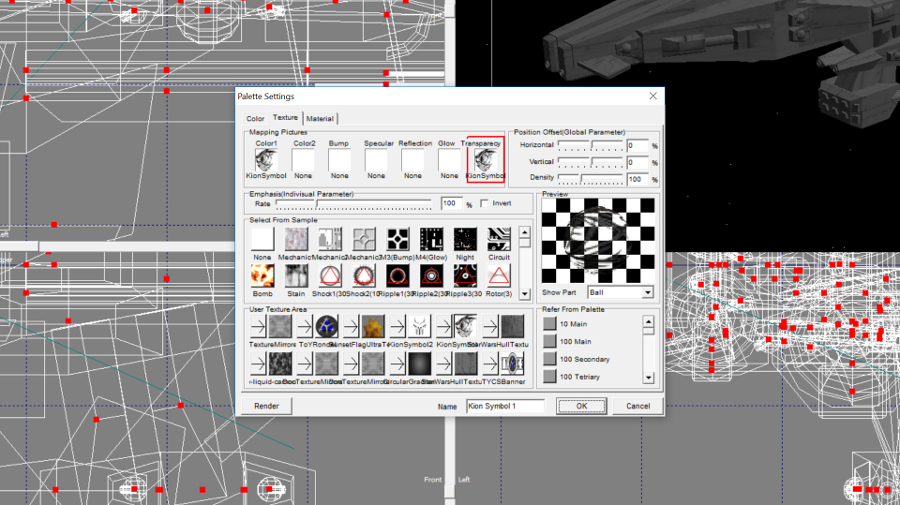
Time to assemble the Part Attribute palette. Some might prefer to save this step until later, but I like to do it right about now in the process. Having the Part Attributes you're going to be using in place will help to guide you in choosing the right Parts and in holding the design to the right theme, especially as you get more detailed. Image Search is your friend; I looked for '____ ____ textures' where the blanks are from our favorite copyrighted film franchise and found plenty of free examples. Three or four is about right; Not every texture will match once you're using it in DoGa and you can always re-use them later. Save them as something memorable since the image interface in DoGa is half-bad. To load a custom texture, open the Part Attributes panel via 'Edit' on the lower right corner, then go to the 'Texture' tab, then the -> next to a blank box or one you don't mind replacing. Type in the name - you did make it memorable, right? - and now you can use it as a texture. To do this, click one of the boxes at the top (Color1 - Transparency) and then select the texture you've added. Each top box does something a little different; See Part Attributes - Advanced Options.
Now you will want to make several different materials with the same texture but at different densities. This is because DoGa doesn't allow texture manipulation on a per-part or per-polygon basis but rather as a single Part Attribute with all densities - resolutions - of the texture applied to the selected parts. To adjust the density, select the box on the right labeled 'Density' and slide this up or down or just type a number instead. I generally make materials for 100% to 10% - 80, 60, 40, and 10. This varies per texture and sometimes I don't use all of them but they are good to have around. Then repeat with the second texture you've selected, and the third, and so on. Note that DoGa does not automatically center the texture - and you might not want to anyway - but if you do, set the Horizontal and Vertical to -(100 - Density) / 2. If you've set the Density to 60 you'll then use -20 in both fields to center it.
Step 4: Layering
I like to think of this next step as working from Large to Medium to Small. Once the initial set of shapes is laid out, I then begin to fill in the gaps and add large features as well as tweaking the overall layout here and there. I'm going to start with the 'neck' between the 'command' and 'engine' sections. A rectangular box along each side of the neck just down from the mid-point turns a sharp hexagon into a lumpy octagon and then a few truncated pyramids over this gives the area some texture. My preference is to focus on one area of a particular design at a time, building it up through various layers until it feels done and then moving on to the next. This helps me to establish an overall look for the finished product and avoid the feeling that things are going too slowly. Also, once I'm done I can look back to that section for inspiration and even to duplicate parts from, such as the small turrets that will be found all over the ship.
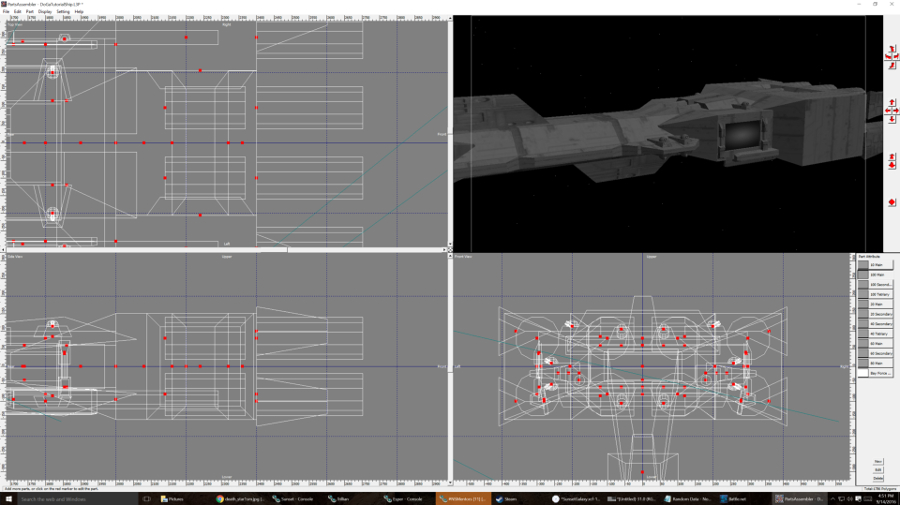
Step 5: The Small Stuff
Building over the top of the pieces added in Step 4, I've added some gun emplacements as well as the guns and taken out one of the large boxes used to establish the layout and replaced it with several others to make a landing bay for small craft. I've added another texture here as well, a semi-transparent radiant that will be a force field over the bay. Note that until you render it it won't show as transparent. This is also the best step to add guns; Generally, a small gun like these should be 1/40th to 1/60th the size of the overall ship. Medium guns should be 1/20th to 1/30th, and the largest can be 1/10th and sometimes larger.

Step 6: Reusing Parts
That's right, more details. But here we get into the idea of re-using parts from one area on another. In this case I've made a sensor mast on the top of the ship and then, using the marque selection tool, duplicated it upside down and then rotated it. Duplicating parts can both save a lot of time (Alt Y, Z, and X) but also give the entire model a sense of connection. If I have an element I'm going to re-use often, one trick I fall back on is to duplicate the parts for that element and then move them off to one side. Then it becomes much easier to select just those parts and duplicate them. You can save a group of Parts as their own custom Part but this has the limitation that you cannot then change the Part Attributes for these Parts. If you do have a particular item - such as a gun turret, rifle, or otherwise complex object - that you plan on using across several models I would instead save those parts as their own regular model and then use 'File > Append' instead. Then you can easily make model-specific changes without resorting to a text editor.
- Step 6b: Cylindrical Cheating
Suppose you want to make a ship or station that is cylindrical or has various parts aligned along a single axis but instead of a symmetrical cylinder - all the parts match those on the other side - you want one that is tri-laterally symmetrical? Or more? Well, there is a reasonably easy way to do that in DoGa but it will take a little work. First, lay out the parts you intend to mirror along one side of the 'core' object. Then, using the marquee select or 'SHIFT'-click or a combination of the two, select those parts. Here's where things can get tricky; Using 'CTRL', move those parts away from the model far enough that you have some room to work. This should be along one of the three major axis (X, Y, Z) because the next step will be to mirror those parts around the relevant axis so they are symmetrical.
But Sunset, you say - I wanted trilateral symmetry!
First, select both groups of parts. Then go up to 'Settings' and 'Rotating Fitting Unit'. There will be a slider there but this only goes up to 15 degrees. Instead, type '120' directly into the first box. Click 'Okay' and now when you try to rotate the parts they will only rotate a full 120 degrees from their starting point. Now, first you want to 'mirror' the parts at the starting position. Two groups of parts on top of each other. Then rotate the new group of parts once - 120 degrees. Then mirror them again. Now you'll have six groups of parts and you can delete the three you don't want. Unless you want six. You can use the same technique to make any symmetric; Just divide the number of radial sets you want (3, 7, 13) into 360 and put that number into the box.
Step 7: Save Your Work
Mostly done. Not much of a Step, is it? Perhaps now is the time to mention another crucial step you should follow regularly: Save Your Work. There's nothing worse than being a few hours into a model and having the program crash. And it does crash. Save early, save often. Since this segment is a little sparse, I'll throw in a bit of an advanced element here - ignore it freely. Speaking of saving and the save files in general, the .L3P file that DoGa creates is nothing more than a carefully formatted text file. Again it would take an entire tutorial to discuss ways to use and manipulate this, but importantly you should know that DoGa actually creates a backup of your save files when you save and that it is possible, if a file is somehow corrupted or something else happens, to restore your model from that save file. In the folder DOGACGA/Data there will be three files for some of your models; A .L3P, a .BMP, and a .$3P. Rename the faulty .L3P file to something else then rename the .$3P to .L3P and you might just get your file back. With that in mind as well, .L3P files are very small and sharing one - and thus your model - with someone else is very easy.
Step 8: Personality
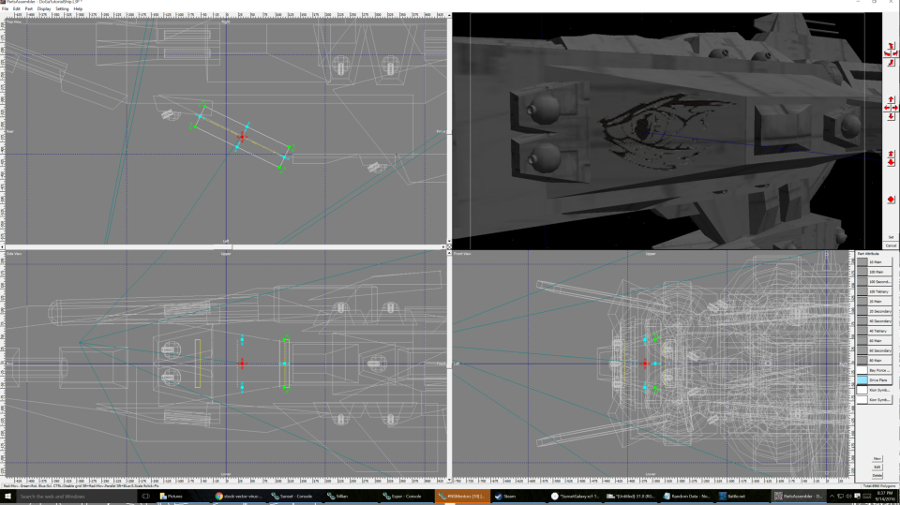
Flags, logos, and insignia can make your design feel like the work of living people rather than just a flat image pried off a blue print. In this case I've created a couple more Part Attributes using the Transparency options (Edit > Texture Tab > Transparency) to add both a menacing eye and a mask insignia in keeping with the Kion's warrior-centered culture. To place them on the model I used just a simple flat square (Basis 1) with one of the new Part Attributes set. With transparent images it is important to place the Part as close to but not touching or inside the Part they are 'painted' on as possible. Zoom in nice and close, adjust the angles, and check your work. Sometimes with transparent images you may want to adjust the emphasis up and down - this makes the image more or less transparent. In this case I also set the 'Color' of the Part Attribute to black so that anything other than the now-transparent white appears as black instead of a shade of gray. Whether you need to or want to do this depends on the image selected; If you need to do a test render to check your work select the Part in question and use the Red Diamond on the right to center on it. This will render much faster than doing the entire design.
Step 9: Before You Render
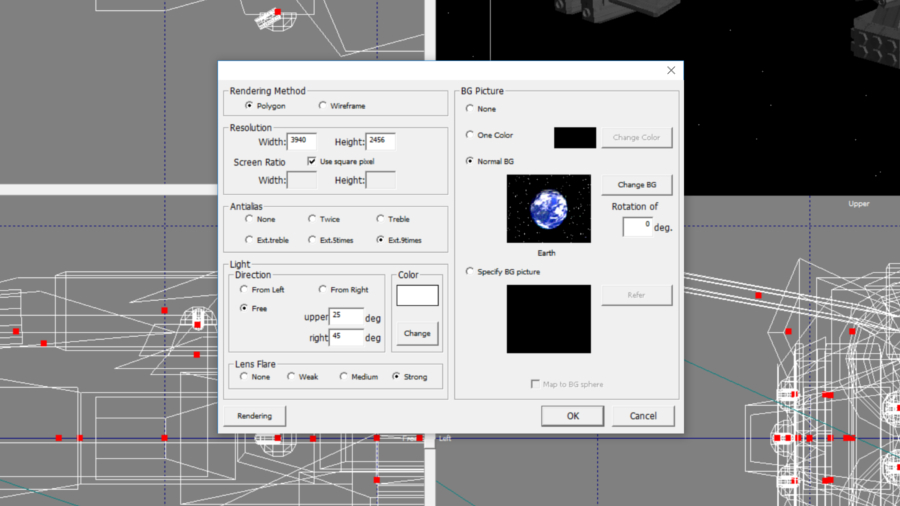
There's a lot of options to play with, but the most important is the resolution; I suggest setting this to 900x600 or so. This is a widescreen format and will fit everything from most phones to desktops and importantly is also the maximum image size allowed inside a forum post. That isn't to say you can't go bigger or smaller but that's the target audience. The higher the resolution the longer it will take to render with a 60,000 polygon model at 4k with high resolution textures taking about an hour. Aside from Resolution there are some other options; Antialias will smooth out the image so it doesn't look as ragged (3x is fine for most purposes, 9x for the vanity shots) and BG Picture will let you use either a single color, one of a number of stock options, or a specified background image. If you chose to use your own background image un-check the 'Map to BG Sphere' box otherwise the image will be distorted - though maybe you want that; Faster-than-light effect?
Step 10: The First Render
Time to sit back and wait with a frosty beverage of your choice. No? There are more options you say? Let's keep this part simple. When you render your image, either through 'Display -> Rendering or the 'Display -> Rendering Options' sub-menu, the layout of the rendering will match that of the low-resolution render in the upper right-hand corner of the main interface. Sometimes adjusting this using the provided controls can be tricky, but you can also change the view from the three Axis Views. There will be a giant teal arrow visible in these windows and this indicates the camera direction along that particular axis. Click the red square at the tip and you can manipulate the camera very precisely before going for that perfect picture.
After DoGa: What's Next?
Once you have a grasp of what you can do with DoGa, there even more that you can do by combining your skills there with one or more programs. I've seen people use their DoGa model as a guide for lineart and from there to a full-color painting, as a background or part of a background for a larger composite, or as the starting point for a more complex model by importing it into another 3D program. With enough time and patience - and the right software - you can even prepare your model for 3D printing.
How About Some Examples?!
Sure, why not? There's a bit of everything here from pure DoGa to plenty of outside additions or even examples of post-DoGa work such as drawing or painting over a DoGa model.
Sunset's devArt Gallery
Scolopendra's devArt Gallery
Vocenae's devArt Gallery
Dargonese' devArt Gallery
Remember, these are devArt and thus might contain NSFW works. Make sure you have your account filters set appropriately and of course you shouldn't be seeing the naughty stuff if you aren't logged in.
And that's the end of V.07. Please, post your question, needs, wants, and I'll start filling in the missed details! Credit goes to Highfort, Vocenae, Scolopendra, Kyrusia, and of course Reploid Productions for various bits, bobs, suggestions, corrections, and notions!
~Sunset


