NATION

PASSWORD

Pimp My Gun Weaponry sharing and User's Guide

A place to put national factbooks, embassy exchanges, and other information regarding the nations of the world. [In character]
User avatar
Kouralia
Post Marshal
 
Posts: 15140
Founded: Oct 30, 2011
Democratic Socialists

Pimp My Gun Weaponry sharing and User's Guide

Postby Kouralia » Sun Nov 27, 2011 9:06 am

A guide to the Pimp My Gun BETA
Pimp My Gun found here


An Introduction

Basically, here on Nationstates there are three main ways of getting images of your country's main military armaments: finding pictures on Google, line art and Pimp My Gun. Using Google is all well and good if you want to use a pre-existing weapon or vehicle (like the M2 Bradley or the AKM) but what if you want to use a rifle which you've made up yourself or a rifle with add-ons like scopes which you can't find pictures of? Then you turn to line art or PMG to create your own weapons or permutations. Lineart is a good method if you have the skill, time and patience to use, it can often create results which are arguably better than most PMG pieces in terms of originality and or skill required. Line art can be used to create anything and doesn't rely on any pre-set things, except your imagination. On the other hand Pimp My Gun is a very simple and useful tool which is for one purpose - to allow people to create images out of a series of pre-set shapes; obviously, given the name, these shapes and the images created are almost always related to some type of rifle or gun. Pimp My Gun is the easier and quicker way to produce weaponry, but that doesn't mean it lacks skill or that the creations are any worse than line art merely because of the format. In actuality the reason most PMG pieces are described as bad is because they are: the ease of use of PMG which can quickly turn into a fiddly nightmare as the project draws to a conclusion can often make the users begin to give up and settle for mere average work over what could be good. There are a range of problems with both PMG and the people who use it which mean that the work is often substandard compared with how it could look - this thread is to help both newcomers to PMG understand how to use it properly, and to help those already experianced improve. In this opening post I'm going to provide some lessons and examples on how to solve the most often occuring and key problems in Pimp My Gun work on this site, along with the rules for how to post your weaponry in the rest of the thread. If you think you don't need to look over the advice and lessons here then head to the bottom of this OP and you'll find the rules, if not then read on.

How to Get Started

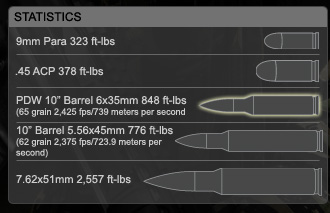
When you first start PMG you'll need to learn how to do a range of things, from how to save your work to how to put your creations together to, finally, how you can give the stats for your weaponry. This section will address all of these.

When you go to Pimp My Gun for the first time you'll be greeted by this page:
Image
There will be a large news feed of the updates which have been made to Pimp My Gun since it first came out. At the top of the news feed will be some buttons, you'll only need the first 3 maybe. The left one is to get back to this 'home' page, the circled one is to get into the most recent version of PMG. This one has many more features than the old one and as such I will be using it and assuming that you will be too. The next one is the older version of PMG, whilst this has more weapons to choose from and it may seem easier to use, it does not have the same variety of parts and, ultimately is much harder to get things 'right' in. You don't need to bother about the last two.
Click the circled link and you'll come here:
Image
This is the main work area - all the tools you'll need are on the bar at the top, here's the lowdown on what these tools can and will do:
Image
(Note - I have split the bar into two, the top is the left half and the bottom is the right half)
Red - The red circle, the button labled 'File' has a small drop down menu which allows you to save .jpgs to your computer, export code, import code and select a full new default weapon to import from it's small library.
Dark Green - Parts brings up a box with another series of buttons to choose from, I'll deal with that in 'putting you weapon together'. Ultimately this is where you go to find individual parts.
Black - I'll be honest, I don't know what this does and I've never had cause to use it. If someone knows what it does then please send me a telegram, otherwise I don't think you should bother with it.
Yellow - These three choose what type of cursor you have/which action it will perform. The left cursor can select objects and move them around, even selecting multiple at once through shift. The centre can change an object's angle, select the object with one click then hold down your cursor on the object, then, as if you're turning a wheel, move the mouse around in a circle and the part will follow. Finally, the left will resize parts for you: one click to select, then click and hold before dragging towards or away from the centre of that part to increase or decrease it's size.
Light Blue - These buttons will, in order, change the height of your currently selected object in relation to the other objects (similar to 'bring to front' and 'send backwards' in Microsoft Word). The left will move it straight to the top, above all other pieces, then the middle two will shunt it piece by piece up or down. Finally, the right will send it down to the bottom in shame.
Pink - These two will show the orientation of the shape (in degrees) and the shape's size (in percent). To change these then just click and alter the values. Important note - the rotation is measured up to 180', going through 90' and -90'. Not to 360', going through 90' and 270'.
Brown - the brown will show you the colour of the shape you have selected. When you select one you can change the colour of certain presetsections of each shape - each section has it's own box which you can click on to further your artistic endeavours.
Light Green - This will flip the selected part on the shown axis, simples.
Dark Blue - These two will allow you to clump parts together for ease of moving them around. Select multiple parts with shift+left mouse then hit the left button th group them together. Hit the right if you want to ungroup them again.
Orenge - This will duplicate the currently selected shape.
Purple - This will irretrievably delete the selected part(s).

Now, that's the basics covered you can go and make a piece - I'm sure you can work out how to find parts (HINT - click parts!). Now you've got a weapon you may want to save it. Open up Microsoft Word and head back to your browser with PMG open in. Follow these steps to save your work:

Click 'File' > Click 'Export' > Click once on the large amount of text that appears, when it's all selected hit Ctrl+C > Go back to Word > Ctrl+V the text into Word > Don't enter any other text into the document, just save it in the same location you save your PMG images with a suitable title (e.g. 'AR15 Marksman Modification - Code')

That will save the code for sharing or to allow you to come back to it after the tab has been closed: if you just want to save the image the do the following:

Click 'File' > Click 'Save JPG' > Move it from where ever it appeared (for me it's in 'Downloads') to wherever you're storing PMG work > Give it a suitable title (e.g. 'AK '11 Grenadier Version')

Well done, you can now create and save your work for later modifications or sharing!

I'm not going to bother with realism and how to make it actually work or look nice here, this is the basics on how to make stuff work. (Warning - I will reference names and describe what's happening now so make sure you understand the above before looking at this!)

Firstly find a start point, a stock for example. To do this go into 'Parts' then into which ever category you want. Follwing that, get a reciever. At this stage I'd recommend trying to make a modification for a weapon (not completely your own) so I'm going to show you (at the end of this section) how to make a modernised Kalashnikov with a green theme. Now you've got those parts, manoeuver them so they're correctly alligned and decide which piece you want next. Continue that last step until it's all arranged how you want it. Now change the colours to your preferred theme - select the part you want to change the colour of and then click any of the small squares appearing next to 'Colour:' in the tool bar. Then change it to the colour you want, if you don't see that colour I'd recommend using this page to find the code for what you want. You can also save a colour for later by entering it's code and pressing the '+' symbol. If you've used code to choose a new colour, hit enter to change the part's colour. If you want to go back to the normal colour, most of the gun-metal-grey is the code 666666 (six lots of '6') or the second colour on the top row of the colours.

Here's an illustrated example of this simple process:

Image


Now you've got your weapon just the way you want it, you'll need some statistics for it so that you and other people are more aware of it's limitations. I'd use the following list for just your national weapon but if you want to sell it on the storefront you'll need something WAY more comprehensive:

Weight -
Cyclic RoF -
Feed Method -
Actions -
Max recommended range -
Deployment Level -
Calibre -

There's a couple more categories you can add, but for something like a standard issue Assault Rifle this should suffice. Now you must choose realistic values for each of these, here's how:

Weight - Go onto Wikipedia and search for the most similar weapon (for my example above search the AKM or AK47 or AK74). Find it's weight and, if necessary, adjust it slightly (if you make a folding stock one and the only value given is the full wooden stock then decrease it a bit).
Cyclic RoF - This is easy as well, do the same thing and poach the value off Wikipedia if you've made a simple mod of a weapon. If it's a new weapon then make it up but remember the following - they're generally around 600-700rpm for Assault Rifles. A little on the faster end for smaller calibrs and a little bit slower for larger.
Feed Method - Simple as most Assault Rifles are fed from either a 20 round or 30 round box magazine. If you're unsure then look at the name of the magazine you put in the image!
Fire Types - This is relatively simple: can it fire in fully automtaic? Can it fire 3-round bursts? Can it fire on semi-automatic? Generally it'll be at least one of those three. One major point is to not balls this up horribly - if you've given it a lower reciever which shows it as capable of semi- and full auto only then don't say '3-Burst'.
Max recommended range - For most assault rifles it's about 300m. If you're unsure then Wikipedia will eb your friend.
Deployment Level - How regularily is it deployed? For a national assault rifle I'd put something like 'All riflemen in a battle-ready squad.'
Calibre - This is simple, but can get nasty... Probably the most common type is 5.56x45NATO. This is applicable for the STANAG, AUG, G36 and PMAG magazines. For any other type just look up the closest weapon on Wikipedia and check it's ammunition type.

Other categories you may want are: 'Barrel Length', 'Length', 'Muzzel Velocity', 'Penetration' and 'Price'. If you are selling the weapon then look at other people's storefronts and emulate their descriptions - but don't plagiarise!


Problem Solving and Ways to Improve

Now, this section assumes you know your bolt from your gas block, but if you don't then don't worry because up first is a short lesson on not making your weapon laughable:

There are two main problems which come under this heading: seriously failing when you make it and realism derping.

Up first is the seriously failing problem. A quick test, can you see all the problems in the first image?

Image

The full list of problems is as follows:

- No Flash Hider
- Sights not any where near in line
- Incorrect magazine (a 9x19mm magazine in a 5.56x45 magazine well)
- Stock not connected to Reciever
- Stock too close to Pistol Grip
- Fore sight not actually connected to anything - even though it is functioning as a gas block it is just sitting on top of the Barrel.
- The AN-PEQ laser system is embedded halfway into the wooden furniture, and even if it was correctly placed on it there's no picatinny rail to attach it to.
- The Barrel is too short. No, I don't mean it should extend another 30cm because this is a PDW not a rifle or any stupid stuff like that. Look at the holes in the Hand Guard and you'll see what I mean.

Image

And, here's how to do it properly:

Image

Right, looking at the latest picture, is it done correctly? NO! I left the flash hider out again but did you see it before I just pointed it out?

Basically, to avoid seriously failing to the point you'll make people laugh at your efforts just make sure you check your weapon before you save and upload or you'll be quite upset by the feedback.

Realism next!

There are generally two main problems with realism that I've discovered: one is that the barrel has been shipped through derp-tonia on the way to being used in your armoury and the other is that the gas parts are screwed up. Here's the solutions in order:

To avoid problems with the barrel try to make two things sure:

One - it's in line with or slightly below the ejection port. If it's slightly above (and thus ejecting the casings downwards) the gun is far more likely to jam. This is something I do quite often but I am just beginning to address. Here's an image of my national assault rifle and you'll see the barrel/ejection port problem.

Image

Two - the barrel is the right size. If it isn't you'll really look like an idiot, here's some demonstrations of failings (an M98 Bravo barrel on an MP5K and an MP5 barrel on a Cheytac M200 Intervention:

Image

To make your weapon seem more realistic you'll have to stop ignoring the mechanism and gas parts. 'Gas parts?' I hear you cry, 'What are they?' Basically there are two gas parts: the block and the tube, I'm not going to explain how they work here because that's not relevant. The block must be correctly placed at least whilst the tube is often optional. Here's the default (and correct) gas parts for the M16, AK and FN SCAR:
Image
Using this you can see how they should be arranged (the barrel is off-white, the gas block is green, the bas tube is red, the magazine is grey and the bolt is silver. The SCAR bolt is differnt as the SCAR bolt is also the tube.) I normally don't bother with the full gas part/interior mechanism arrangement, I do the following (different colour scheme):
Image
See the bottom? It gives the impression of there being a full mechanism but there isn't. If you know what you're doing then you might as well just do that unless you're going to do a stripped down view as well.


I'm not going to show you how to blend, or even tell you you should. I'm going to tell you what to do to blend and then show you the consequences of not blending on complex projects.

To blend you just need to find the borders of shapes which look bad by being there and cover them up with a 'shape' from the shapes section of 'Parts>Misc>shapes'. I'd reccommend using the square and also increasing the size of your weapon first to make it more accurate. To blow your weapon up group ALL the parts together and set the size to '200' (this is so after the blending you know what to do to get it to the right size). Now get out a square and put it to the right colour, then move it over the line without it covering anything you want to keep (you may have to make the square smaller!), duplicate it and continue until all lines you do not want are gone. Now group your weapon and the blending marks together - you'll see it's now at size '100', this is why you made it twice as big in the first place because now you just need to set it to '50' and you're done!

Here's why blending is often necessary:
Image
(note, a slight problem occured with the upper, front hand guard)
You'll also see that a new section appeared in front of the trigger - this is because ther is also 'white blending' or blanking out. Basically you may find that a piece you want to use is not meant for that purpose (the magwell in that is a foregrip) and that piece may not fit, then you must cover it up with whiteness. Below is the fully unblended or blanked weapon:
Image
Horrific, eh?


Rules for Posting

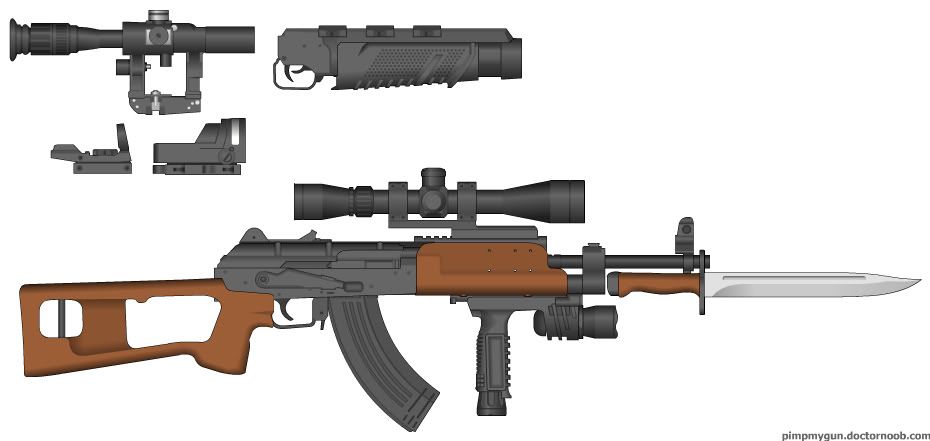
Now I think you're ready to unleash your creativity on the unsuspecting thread, but first, here are some rules -

1. SPOILER YOUR GUNS! If you don't spoiler them then the thread is filled with masses and masses of pictures and it takes longer to load on slow connections. To spoiler your image do the following:

(spoiler=*YOUR WEAPON NAME GOES HERE*) *YOUR IMAGE GOES HERE* (/spoiler)

Do that, but using [ and ] instead of ( and ). Spoilering is what I've used on the individual lessons and stuff above, those small grey boxes. If you don't then I'll ask you to politely, if you fail again then I'll ask you mroe forcefully and eventually I'll ask you to leave the thread.

2. Expect and accept critiscism! If you post here then you will probably get crits from someone. They may be entirely positive but then again they may not be, no matter what form they take always remain as civil as the critic when replying - if they go 'That's shit' and say nothing else (nothing constructive or anything) then feel free to be less than civil back to them (but not openly fighting each other please, this is for designs of weapons, not using them!), on the other hand if they point out faults and give you advice than don't go 'Bollocks to you because It's my gun, I'll do whatever I want with it!'

3. Label your work properly - I'd say you should label your work in the spoiler tag to clarify the weapon's intention and avoid conforntation, here's the ones I'd accept here:

'Exercise' - an exercise in something, like practising your blending.
'WiP' - not finished yet.
'Modification' - not an entirely new gun so please don't bash me for not being original!
'Complete' - a complete weapon ready for the armouries.
'Example' - an example of improvements that could be made, posted to help another user with their weapon.
(if you think fo any more I'll add them here, but if they're not here then don't complain if someone mis classifies it in their head.

4. Use your common sense! Just because someone hasn't said 'WiP' doesn't mean you should always assume that a custom designed pistol grip attached to a custom reciever and nothing else is complete!

5. This is for PMG only. As such I will not tolerate anything insulting PMG or the users because they use PMG. I will alson not tolerate any line art for the sake of line art. If you want to show us how you've turned your Lineart Shotty into a PMG gun or Vice Versa then fine, also fine is asking for advice for parts to use when doing the former - but not for the purpose of wanting crits on line art alone or for just mocking PMG users unfoundedly.
There, that's it. Post your weapons and expect critiscism; give crits in good grace and accept them in such also and finally, if you can think of anything that I could put here then telgram me or post here!
As an aside, I apologise fr any typos or mistakes in this - point them out to me by telegram and I'll fix them.
Kouralia:

User avatar
DASHES
Diplomat
 
Posts: 766
Founded: Nov 11, 2010
Ex-Nation

Postby DASHES » Sun Nov 27, 2011 11:04 am

This is a very good guide to PMG usage. Great job.

I'll try to make a PMG version of my lineart weapons, using your suggestions.
DASHES = Democratic Autocratic Socialist Holy Empire of Strongholds.


Need help making your Armed Forces or one of your Military units realistic?
Visit the current NS Military Realism Consultation thread immediately.
It can only help. It helped me.

User avatar
The British Antarctic Colonies
Secretary
 
Posts: 27
Founded: Oct 19, 2011
Ex-Nation

Postby The British Antarctic Colonies » Mon Nov 28, 2011 2:07 pm

Image


The second attempt at making a weapon for my small, urban-warfare-orientated army.
After joint field testing with the Kouralian National Armouries Procurement and Testing Division, a number of design flaws were discovered in the original L1. These included: Discomfort with the stock, difficulties in loading the magazine, and occasionally, serious problems with the gases expelled by the bullet burning the faces of the testers. These problems were remedied in the L1A1, which is due to phase out the L1 within 6 months. Other modifications were made, leading to a fully complete, well-rounded weapon.

N.B. The top rifle is just an example of the base rifle, whereas the bottom one is the one that will be issued to soldiers.

Stats -

Weight - 3.2kg loaded
Recommended maximum range - 200m
Cyclic RoF -700rpm
Ammunition - 9mm NATO
Actions - Semi-, burst-, full auto fire capable.

For those interested,there's the original L1 on "Tyrasengineer"'s Deviantart page.
Last edited by The British Antarctic Colonies on Mon Nov 28, 2011 2:09 pm, edited 3 times in total.

User avatar
Lazssia
Senator
 
Posts: 4047
Founded: Apr 13, 2011
Ex-Nation

Postby Lazssia » Mon Nov 28, 2011 3:24 pm

My M12 with a few modifications. I'v been told before it's a good design, personally I think it's average.
Image
Last edited by Lazssia on Mon Nov 28, 2011 3:30 pm, edited 2 times in total.

User avatar
Ruskarkand
Senator
 
Posts: 3985
Founded: Jan 07, 2011
Ex-Nation

Postby Ruskarkand » Mon Nov 28, 2011 3:37 pm

Magazines.
Image
No Magazines.
Image

D.K.M - 77 // Dragonkin Manufacturing Model Seventy Seven
Caliber: 5.56x45 NATO.
Magazine Capacity: 30 5.56x45 NATO rounds.
Weight: 3.7kg/8.1 lb
Length: 720 millimeters.
Barrel Length: 406 millimeters.
Mechanism: Progressive Trigger, Semi-Automatic and Automatic.
Operating Mechanism: Gas Operated, Rotating Bolt.
Rate of Fire: Appx. 550 -> 600 Rounds per Minute.
Recommended Range: 250 -> 300 meters.

Well, basic writeup for this thing. I decided to make this as my first attempt at blending together different parts and quite frankly, I think it came out pretty well, but I am inexperienced in the field of blending in the parts using PMG itself, so I will let someone else be the judge of that. I gave it the BS-1 Tishina because it needed a forward grip, and I thought that an integrated silent launcher wouldn't be all that bad on the rifle, despite the fact that the soldier carrying it would need a few magazines full of blank rounds in order to operate it, but that's besides the point.

I am probably looking at this thing being finished now, I mean.. I didn't really do any initial planning for this rifle, I just read over the guide and decided to have a stab at it, and to test blending whilst I was at it.
- Scottish resident of the United Kingdom.
- Appreciator of Dragons and Draconic things.
- Minor FanT. FT.
"Slavish adherence to formal ritual is a sign that one has nothing better to think about."

User avatar
Lazssia
Senator
 
Posts: 4047
Founded: Apr 13, 2011
Ex-Nation

Postby Lazssia » Mon Nov 28, 2011 9:41 pm

Just got through making my new carbine. As usual, it's mediocre, but I think it turned out okay. I'm still working on the stats, but it fires 6.8x45mm.
Image

User avatar
Drekka
Ambassador
 
Posts: 1298
Founded: Aug 03, 2011
Ex-Nation

Postby Drekka » Tue Nov 29, 2011 12:09 am

A Domestically produced gun for our PersonalDefenseCarbine Competition ( licensed by the company , HK) (Modified from G36)
Its Designed to be the modern equivalent to the M1 Carbine. Its lack of Innovation is compensated by its compatible parts with Drekka's
current Service Rifle, the G36.


G36 PDC ( 6x35 kac)
http://pimpmygun.doctornoob.com/download.php


-Rate of fire: 700 RPM
-Magazine : 40 rounds
-Range : 300 meters


The 6x35mm Round
Image


(OOC: I know it sucks but its kinda cool)

User avatar
Kouralia
Post Marshal
 
Posts: 15140
Founded: Oct 30, 2011
Democratic Socialists

Postby Kouralia » Tue Nov 29, 2011 12:42 am

The British Antarctic Colonies wrote:
The second attempt at making a weapon for my small, urban-warfare-orientated army.
Urban warfare, in the Antarctic? Pray, do tell how that works. XD I know what you'll say, but again - 9mm is not a good calibre to use. There's only really one problem with it and it's just something to bear in mind for future designs - the upper rail attachments (EOTech and iron sights) are a little bit too high up, they should entirely obstruct the view of the Rail bits.

Lazssia wrote:My M12 with a few modifications. I'v been told before it's a good design, personally I think it's average.

The link's not working, I've spent a while trying to look at it, but you should probably just re-upload.

Ruskarkand wrote:
Magazines.
(Image)
No Magazines.
(Image)

D.K.M - 77 // Dragonkin Manufacturing Model Seventy Seven
Caliber: 5.56x45 NATO.
Magazine Capacity: 30 5.56x45 NATO rounds.
Weight: 3.7kg/8.1 lb
Length: 720 millimeters.
Barrel Length: 406 millimeters.
Mechanism: Progressive Trigger, Semi-Automatic and Automatic.
Operating Mechanism: Gas Operated, Rotating Bolt.
Rate of Fire: Appx. 550 -> 600 Rounds per Minute.
Recommended Range: 250 -> 300 meters.

Well, basic writeup for this thing. I decided to make this as my first attempt at blending together different parts and quite frankly, I think it came out pretty well, but I am inexperienced in the field of blending in the parts using PMG itself, so I will let someone else be the judge of that. I gave it the BS-1 Tishina because it needed a forward grip, and I thought that an integrated silent launcher wouldn't be all that bad on the rifle, despite the fact that the soldier carrying it would need a few magazines full of blank rounds in order to operate it, but that's besides the point.

I am probably looking at this thing being finished now, I mean.. I didn't really do any initial planning for this rifle, I just read over the guide and decided to have a stab at it, and to test blending whilst I was at it.

You sir, win an internet! It took me almost 20 seconds to realise that there was an ACR reciever ABOVE the AU and not the black tube bit poking out from below... The design is good and the idea sound, however, if you decide to redo this weapon then I'd cover up more of the barrel and gas parts with a handguard - the gas parts look like they're in a reasonably dangerous place and look quite fragile, whilst the barrel is open to the elements with noting covering it so it could become damaged more easily. The one final point is that through your choices of sights: the rear one is too far back - that's roughly where the cheek should go. Other than that, the best I've seen so far.

Lazssia wrote:Just got through making my new carbine. As usual, it's mediocre, but I think it turned out okay. I'm still working on the stats, but it fires 6.8x45mm.

There's nothing wrong with it as per se, it just seems to be a rather bland design. I'd recommend using the New PMG to remake it with some more original and exciting features.
Drekka wrote:A Domestically produced gun for our PersonalDefenseCarbine Competition ( licensed by the company , HK) (Modified from G36)
It's designed to be the modern equivalent to the M1 Carbine. Its lack of innovation is compensated by its compatible parts with Drekka's
current Service Rifle, the G36.
G36 PDC ( 6x35 kac)
http://pimpmygun.doctornoob.com/download.php
The 6x35mm Round
(Image)
Erm, I can't see that link either, you may want to upload the image to something like Image Shack then bang in the code here. I do like the bullet comparison image though.
Kouralia:

User avatar
Kusthet
Diplomat
 
Posts: 593
Founded: Nov 26, 2011
Ex-Nation

Postby Kusthet » Tue Nov 29, 2011 2:21 am

http://s108.photobucket.com/albums/n37/ ... PimpMyGun/

Yeah, just follow the link for a whole gallery, feel free to use them as inspiration, though the ones titled with an 'attn' above them were requested by others from this forum. It's my assorted explorations into PMG, from hilariously unworkable bullpup pistols through to A revolver-pattern sniper rifle

No feedback needed, most of them are horribly ancient if not designed for my previous nation. I know plenty of them are bland, over-tacticlol or just plain unworkable. Still, I think I had a few good ideas when I made them, and hey, what's a little inspiration between friends?
Last edited by Kusthet on Tue Nov 29, 2011 2:27 am, edited 1 time in total.
I'm baaa~aack

User avatar
Drekka
Ambassador
 
Posts: 1298
Founded: Aug 03, 2011
Ex-Nation

Postby Drekka » Tue Nov 29, 2011 10:18 pm

Hows this ( Do you see it now?)
Image


( OOC: What a pathetic size)

More info About the G36 PDC

-Weighs a mere 6 poundswith the optional LandWarrior-like accessories ( Infantry) or an In-stock Survival kit (pilots/drivers)

-3x magnified scope ( Lower)
Image
Image

-1x Red dot sight ( upper optional)
Image


-Operation system ( Refined for much more accuracy from the AK weapon system)
Image
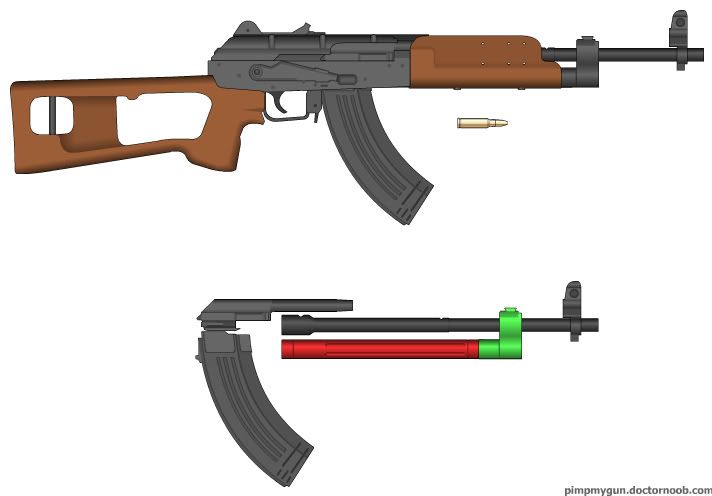
Thanks to the self-regulating gas block, the gas-operated weapon works extremely reliably and only requires a minimum of maintenance.
Last edited by Drekka on Tue Nov 29, 2011 10:50 pm, edited 3 times in total.

User avatar
Rapalfe
Bureaucrat
 
Posts: 58
Founded: Nov 27, 2011
Ex-Nation

Postby Rapalfe » Wed Nov 30, 2011 5:41 am

tag

User avatar
Kouralia
Post Marshal
 
Posts: 15140
Founded: Oct 30, 2011
Democratic Socialists

Postby Kouralia » Wed Nov 30, 2011 10:49 am

Drekka wrote:Hows this ( Do you see it now?)
(Image)


Hmm, for a PDW/Carbine type weapon for issue to pilots/drivers and the like, it seems a bit strange that it doesn't have a folding, collapsible or adjustable stock. The use of the 'sights' Picatinny rail with it's large carry handle like section also seems to defeat the object of a compact weapon due to it's height. Otherwise, I can't see any problem with it as a weapon.
Kouralia:

User avatar
Tletl
Chargé d'Affaires
 
Posts: 371
Founded: Jul 06, 2010
Ex-Nation

Postby Tletl » Wed Nov 30, 2011 1:30 pm

Here's my first attempt at making a gun.
Image

Caliber: 7.62X51 NATO.
Magazine Capacity:Detachable 30 round Magazine
Weight: 4.05 kg/ 8.9 pounds
Length: 905 millimeters.
Barrel Length: 406 millimeters.
Operating Mechanism: Gas Operated, Rotating Bolt.
Rate of Fire: Appx. 600 Rounds per Minute.
Recommended Range: 250 - 600 Meters upon sight adjustments
Last edited by Tletl on Tue Dec 13, 2011 3:16 pm, edited 1 time in total.

User avatar
Rapalfe
Bureaucrat
 
Posts: 58
Founded: Nov 27, 2011
Ex-Nation

Postby Rapalfe » Wed Nov 30, 2011 3:32 pm

Image


Image


Image


Image


I've been using PMG for a little over 8 months now and had around 100-125 weapons saved but some viruses later I only have the ones I posted...

User avatar
Drekka
Ambassador
 
Posts: 1298
Founded: Aug 03, 2011
Ex-Nation

Postby Drekka » Wed Nov 30, 2011 4:27 pm

Kouralia wrote:
Drekka wrote:Hows this ( Do you see it now?)
(Image)


Hmm, for a PDW/Carbine type weapon for issue to pilots/drivers and the like, it seems a bit strange that it doesn't have a folding, collapsible or adjustable stock. The use of the 'sights' Picatinny rail with it's large carry handle like section also seems to defeat the object of a compact weapon due to it's height. Otherwise, I can't see any problem with it as a weapon.


The Fixed stock houses either a Survival Kit ( Non-Infantry) or a LandWarrior- like setup ( CQB Infantry) ; Folding
stocks tent to be left "unfolded" during an emergency. Fixed stock allows for a ready-to-shoot weapon. The gun is roughly 2 feet long anyways.


The gun lacks Picatinny rails because they are Very heavy, un-conforable, and it wasn't intended for Special Operators.

The 2 Digital sights allow for quick targeting ; Carry handle makes it quick to grab

User avatar
The British Antarctic Colonies
Secretary
 
Posts: 27
Founded: Oct 19, 2011
Ex-Nation

Postby The British Antarctic Colonies » Sun Dec 04, 2011 3:09 am

BACA L2A1:
Image


Stats:
After a need for a marksman rifle for the few situations where the BACA would be deployed outside of the Colonies' three main cities (since everything else is a barren, resourceless wasteland) was identified, the BACA L2A1 was developed. The rifle will be field tested when the BACA is next deployed in a peacekeeping mission outside of its own borders. It is designed to be lightweight and practical for extended periods of use.

Stats:
Weight - 4.8 kg
Recommended maximum range - 700m with optics
Cyclic RoF - 180 rpm
Ammunition - 7.62x51mm NATO
Actions - Semi-automatic only

User avatar
Moriskov
Ambassador
 
Posts: 1829
Founded: Jun 08, 2008
Father Knows Best State

Postby Moriskov » Sun Dec 04, 2011 3:20 am

I'll edit this post later with a few of my guns. Just saw this as I was going to bed. I also would like to say this a great idea. This should be a helpful tool.
EDIT: Okay here are is one of my guns. I'll update it with the correct info later. Kinda of splitting my attention between a paper due tuesday, an RP, and other projects ate the moment.
Last edited by Moriskov on Sun Dec 04, 2011 2:16 pm, edited 1 time in total.
"Vengeance is like a ghost. It takes over every man it touches. It's thirst cannot be quenched, until the last man standing has fallen. You may be able to destroy me, but the beast will eventually come for you."
Vladimir Makarov
Osaea wrote:
Alowwvia wrote:And for every ATGM, there's a guy with a pistol that can kill him for much cheaper.


True. But can the guy with a pistol kill the tank? Only if he's Mattias Nilsson.

.............. \_▂▂▂████▄▄▂___
.........[█|||█████WOT PLAYER████]▄▄▄▄▄▄▄▄▄▄▄▄▄▄▄▄▄▄▃▂
..__▂▄▅█████████████████████▄▃▂
I████Moriskov [1AR-R] - T-43 ██████████]
I████████████████████████████████]
◥⊙▲⊙▲⊙▲⊙▲⊙▲⊙▲⊙▲⊙▲⊙▲⊙▲⊙▲⊙▲◤

Pronounced: Mor-skoj

User avatar
Kouralia
Post Marshal
 
Posts: 15140
Founded: Oct 30, 2011
Democratic Socialists

Postby Kouralia » Sun Dec 04, 2011 2:02 pm

The British Antarctic Colonies wrote:
([url=http://img35.imageshack.us/img35/7401/bacal2a1.jpg]Image)[/url]

Stats:
After a need for a marksman rifle for the few situations where the BACA would be deployed outside of the Colonies' three main cities (since everything else is a barren, resourceless wasteland) was identified, the BACA L2A1 was developed. The rifle will be field tested when the BACA is next deployed in a peacekeeping mission outside of its own borders. It is designed to be lightweight and practical for extended periods of use.

Stats:
Weight - 4.8 kg
Recommended maximum range - 700m with optics
Cyclic RoF - 180 rpm
Ammunition - 7.62x51mm NATO
Actions - Semi-automatic only


Hmm, an interesting idea with the problems being -

A flimsy stock attachment
Exposed Gas parts
Exposed barrel
Handguard attached to the gas parts
and that's it.
Kouralia:

User avatar
Kel-Elysia
Ambassador
 
Posts: 1303
Founded: Jan 21, 2011
Ex-Nation

Postby Kel-Elysia » Sun Dec 04, 2011 2:16 pm

OOC: Note that these are all just copied and pasted from my under-construction storefront and factbook. Just FYI.

Semiautomatic/Automatic Rifles:
Image
Type: Battle Rifle, Designated Marksman Rifle
Service history:
-In service: 1991 (Mk-36A1)–Present (Mk-36A3M)
-Used by: Kel-Elysian Imperial Guard, Kel-Elysian Imperial Marine Corps (As DMR)
-Wars:
--Mk-36A1: Persian Gulf Crusade, Invasion of Great Britain
--Mk-36A2: First Middle Eastern Crusade, Istanbul Crusade
--Mk-36A3M: Second Middle Eastern Crusade
Production history:
-Designed: 1989 (Mk-36A1), 1999 (Mk-36A2), 2009 (Mk-36A3M)
-Produced: 1990-Present
-Number Built: 10.9 Million (As of 2011)
-Variants: Mk-36A1, Mk-36A2, Mk-36A3M, Mk-36-DMR
Specifications
-Weight: 9.0 lb empty, 12.5 lb (5.2 kg) w/ loaded magazine
-Length: 47 in.
-Barrel length: 22 in
-Cartridge: 7.62x51mm Imperial
-Action: Gas-operated, Rotating Bolt
-Rate of fire: As fast as a man can pull the trigger; however, accuracy is questionable when trying to pull shots off in rapid succession.
-Muzzle velocity: 2,800 ft/s
-Effective range: 575 yds, 900+ yds with optics
-Feed system: 30-round detachable box magazine
-Sights: Aperture rear sight, "Barleycorn" Front Sight

-Cost Per Unit: cR 700 (927.50 USD)

Description: The current pride and joy of Exitus Defense Industries, the Mk-36A3M is a great continuation of the Mk-36 series of rifles. The Mk-36A3M retains the reliability and durability of its predecessors with versatility found only in top-quality designs. The Mk-36 series has been in service with the Imperial Ground Forces for 20 years, and never once in that period has a Guardsman or Marine said that his rifle let him down.


Image
Type: Assault Rifle, Law Enforcement Carbine
Service history:
-In service: 2001-Present
-Used by: Imperial Enforcer Corps
-Wars: N/A
Production history:
-Designed: 1999
-Produced: 2000-Present
-Number Built: 3.1 Million (As of 2011)
-Variants: Mk-212SD, Mk-212 SOPMOD
Specifications
-Weight: 5.1 lb empty, 6.2 lb w/ loaded magazine
-Length: 33 in
-Barrel length: 14.5 in
-Cartridge: 5.56x45mm Imperial
-Action: Gas-operated, Rotating Bolt
-Rate of fire: 1200 Rounds/Minute
-Muzzle velocity: 2,900 ft/s
-Effective range: 500 yds
-Feed system: 30-round detachable box magazine
-Sights: Various Optics, issued with Exitus Quickscope.

-Cost Per Unit: cR 1,000 (1,325 USD)

Description: An advanced, lightweight carbine used by the Imperial Enforcer Corps. The futuristic-looking Mk-212 is ideal for close-quarters combat with its short barrel length and high rate of fire. The Exitus Quickscope electronic sight that the rifle comes with allows users to react to threats more quickly with the split-second precision that makes the difference between life and death in a combat situation.


Image
Type: Assault Rifle
Service history:
-In service: 1938-1992 (Kel-Elysian Armed Forces), 1952-Present (Various others)
-Used by: Kel-Elysian Imperial Guard, Kel-Elysian Marine Corps, various other nations
-Wars: Second Great Crusade (World War II), First Korean Crusade, Second Pacific Crusade (Imperial Conquest of Korea and Japan), Vietnam Crusade, Kel-Elysian Civil War, First Soviet Crusade, Second Soviet Crusade, Persian Gulf Crusade
Production history:
-Designed: 1935-1938
-Produced: 1938-Present (By various manufacturers and subsidiaries)
-Number Built: 163.2 Million (As of 2011)
-Variants: Mk-21C
Specifications
-Weight: 9.0 lb empty, 12.5 lb (5.2 kg) w/ loaded magazine
-Length: 45 in.
-Barrel length: 20 in
-Cartridge: 8x38mm Kel-Elysian
-Action: Gas-operated, Rotating Bolt
-Rate of fire: Semiautomatic (1938-1943), 550 Rounds/Minute (1943-Present)
-Muzzle velocity: 2,800 ft/s
-Effective range: 500 yds
-Feed system: 20-round detachable box magazine
-Sights: Aperture rear sight, "Barleycorn" Front Sight

-Cost Per Unit: cR 150 (206.25 USD)

Description: 73 years and the immortalized Mk-21 Service Autorifle is still a popular choice for soldiers all over the world. Among the world's first true assault rifles, the Mk-21 is commonly referred to as the "Kel-Elysian AK," due to its durability, affordability, and simplicity. The Mk-21 is a favorite for soldiers, collectors, and World War II reenactors alike. The Mk-21 is so popular around the world that there have been reports of opposing armies going to war with each other equipped with identical Mk-21 rifles.


Bolt-Action Rifles:
Image
Type: Bolt-action Combat Rifle
Service history:
-In service: 1903-1957
-Used by: Kel-Elysian Imperial Guard
-Wars: First Great Crusade (World War I), Second Great Crusade (World War II), First Korean Crusade, Second Pacific Crusade (Imperial Conquest of Korea and Japan)
Production history:
-Designed: 1898-1901
-Produced: 1903-1954
-Number Built: 16.9 Million
-Variants: Mk-3 Longshot (Marksman Variant)
Specifications
-Weight: 9.0 lb empty, 12.5 lb (5.2 kg) w/ loaded magazine
-Length: 52 in.
-Barrel length: 24 in
-Cartridge: 8x57mm Mauser
-Action: Bolt Action
-Rate of fire: Varies
-Muzzle velocity: 2,800 ft/s
-Effective range: 500 yds
-Feed system: 5-round Stripper Clips
-Sights: Aperture rear sight, Tangent Front Sights

-Cost Per Unit: cR 3000 (3,975 USD)

Description: Exitus Defense Industries' first service rifle for the Imperial military, the antique Mk-3 is now widely available for civilian ownership. It saw the Imperial Guard through both World Wars, Korea, and the Second Pacific War. Each rifle has a story under its belt-it may have been passed down through the hands of several soldiers who bravely gave their lives in the line of duty, or it could have been the lifeline of a Guardsman through five years of constant warfare. The Mk-3 is an absolute must-have for collectors and history enthusiasts.


Sub-Machine Guns
Image
Type: Sub-Machine Gun
Service history:
-In service: 1997-Present
-Used by: Imperial Enforcer Corps, Imperial Inquisition
-Wars: N/A
Production history:
-Designed: 1994-1996
-Produced: 1996-Present
-Number Built: 8.1 Million (As of 2011)
-Variants: Mk-66SD
Specifications
-Weight: 4.2 lb empty, 5.5 lb (5.2 kg) w/ loaded magazine
-Length: 28 in.
-Barrel length: 12 in
-Cartridge: 10x25mm Imperial
-Action: Gas-operated, Rotating Bolt
-Rate of fire: 1200 Rounds/Minute
-Muzzle velocity: 1,400 ft/s
-Effective range: 200 yds
-Feed system: 30-round detachable box magazine
-Sights: Aperture rear sight, Hooded Post Front Sight

-Cost Per Unit: cR 800 (1,060 USD)

Description: The Exitus Mk-66 Compact Autorifle is the weapon of choice for Imperial Inquisition operatives, as well as SWAT units of the Imperial Enforcer Corps because of its light weight and its ease of storage. Its 10x25mm cartridge provides superb stopping power without sacrificing accuracy, but is not recommended for use in longer-range scenarios.


Image
Type: Sub-Machine Gun
Service history:
-In service: 1941-1992 (Kel-Elysian Armed Forces), 1949-Present (Various others)
-Used by: Kel-Elysian Imperial Guard, Kel-Elysian Imperial Marine Corps, Kel-Elysian Imperial Guard Air Corps, Kel-Elysian Imperial Holy Fleet
-Wars: Second Great Crusade (World War II), First Korean Crusade, Second Pacific Crusade (Imperial Conquest of Korea and Japan), Vietnam Crusade, Kel-Elysian Civil War, First Soviet Crusade, Second Soviet Crusade, Persian Gulf Crusade
Production history:
-Designed: 1938-1940
-Produced: 1940-Present (By various manufacturers and subsidiaries)
-Number Built: 88.1 Million (As of 2011)
-Variants: N/A
Specifications
-Weight: 4 lb empty, 6.5 lb (5.2 kg) w/ loaded magazine
-Length: 28 in.
-Barrel length: 12 in
-Cartridge: 10x25mm Imperial
-Action: Gas-operated, Rotating Bolt
-Rate of fire: 1200 Rounds/Minute
-Muzzle velocity: 1,200 ft/s
-Effective range: 175 yds
-Feed system: 80-round detachable drum magazine
-Sights: Aperture rear sight, "Barleycorn" Front Sight

Cost Per Unit: cR 150 (206.25 USD)

Description: The sub-machine gun variant of the Mk-21 Autorifle. The Mk-21C saw extensive combat during the Second Great Crusade. Upon comparing the sound of the Mk-21C to that of the German MG-42, Imperial soldiers nicknamed Mk-21Cs "Mini Buzz-saws" or "Baby '42s." The weapon is extremely popular among many militaries as a paratrooper carbine.


Lionheart Armories Mk-115 Compact Autorifle (5.56x45mm)
Image


Machine Guns

Exitus Defense Industries Mk-97 Light Stubber (7.62x51mm)
Image


Exitus Defense Industries Mk-88 Light Stubber (7.62x51mm)
Image


Shotguns

Exitus Defense Industries Mk-10 Infantry Shotgun
Image
|Factbook|Embassy Program|FT Military Factbook|Q&A
I am a character-oriented RP'er. You have been warned.

Don't take anything I say in an RP into an OOC context. Seriously, please don't.
My Religious and Political Guns: Apatheticism and Voter Apathy Party, every time.
US Marine.
One of NS's resident Korean-Americans.
Proud Anime, Blizzard, Bethesda and Bungie nerd.
Just because I listen to Soviet and North Korean patriotic music doesn't mean I'm a communist. It's not my fault that we capitalist dogs don't spend money on a decent choir.

User avatar
Kouralia
Post Marshal
 
Posts: 15140
Founded: Oct 30, 2011
Democratic Socialists

Postby Kouralia » Sun Dec 04, 2011 2:26 pm

Kel-Elysia wrote:
(Image)
Type: Assault Rifle, Law Enforcement Carbine
Service history:
-In service: 2001-Present
-Used by: Imperial Enforcer Corps
-Wars: N/A
Production history:
-Designed: 1999
-Produced: 2000-Present
-Number Built: 3.1 Million (As of 2011)
-Variants: Mk-212SD, Mk-212 SOPMOD
Specifications
-Weight: 5.1 lb empty, 6.2 lb w/ loaded magazine
-Length: 33 in
-Barrel length: 14.5 in
-Cartridge: 5.56x45mm Imperial
-Action: Gas-operated, Rotating Bolt
-Rate of fire: 1200 Rounds/Minute
-Muzzle velocity: 2,900 ft/s
-Effective range: 500 yds
-Feed system: 30-round detachable box magazine
-Sights: Various Optics, issued with Exitus Quickscope.

-Cost Per Unit: cR 1,000 (1,325 USD)

Description: An advanced, lightweight carbine used by the Imperial Enforcer Corps. The futuristic-looking Mk-212 is ideal for close-quarters combat with its short barrel length and high rate of fire. The Exitus Quickscope electronic sight that the rifle comes with allows users to react to threats more quickly with the split-second precision that makes the difference between life and death in a combat situation.


Exitus Defense Industries Mk-10 Infantry Shotgun


Most of these are pretty good. I'm just flagging up a few points:
The shotgun and '88 stubber both have the rear sights incorrectly fitted - that sticky out bit should be flush with the weapon.
The 212 has a few things wrong with it: 1) you've missed off the butt stock, 2) the sight is way too low down to be used comfortably, 3) the UGL seems to be attaching to nothing/the solid side of the hand guard and finally 4) you may want to consider blending on it.
Kouralia:

User avatar
Moriskov
Ambassador
 
Posts: 1829
Founded: Jun 08, 2008
Father Knows Best State

Postby Moriskov » Sun Dec 04, 2011 3:02 pm

Moriskov wrote:I'll edit this post later with a few of my guns. Just saw this as I was going to bed. I also would like to say this a great idea. This should be a helpful tool.
EDIT: Okay here are is one of my guns. I'll update it with the correct info later. Kinda of splitting my attention between a paper due tuesday, an RP, and other projects ate the moment.

Updated
"Vengeance is like a ghost. It takes over every man it touches. It's thirst cannot be quenched, until the last man standing has fallen. You may be able to destroy me, but the beast will eventually come for you."
Vladimir Makarov
Osaea wrote:
Alowwvia wrote:And for every ATGM, there's a guy with a pistol that can kill him for much cheaper.


True. But can the guy with a pistol kill the tank? Only if he's Mattias Nilsson.

.............. \_▂▂▂████▄▄▂___
.........[█|||█████WOT PLAYER████]▄▄▄▄▄▄▄▄▄▄▄▄▄▄▄▄▄▄▃▂
..__▂▄▅█████████████████████▄▃▂
I████Moriskov [1AR-R] - T-43 ██████████]
I████████████████████████████████]
◥⊙▲⊙▲⊙▲⊙▲⊙▲⊙▲⊙▲⊙▲⊙▲⊙▲⊙▲⊙▲◤

Pronounced: Mor-skoj

User avatar
Lazssia
Senator
 
Posts: 4047
Founded: Apr 13, 2011
Ex-Nation

Postby Lazssia » Tue Dec 13, 2011 2:04 pm

Not sure if you're still paying attention to this thread Kour, but though I'd post one of my new pieces.
Image
Action: Gas Operated, Rotating Bolt.
Weight: 3.? Kg
Length:?
Barrel Length:?
Cartridge:6.8 SPC
Rate of Fire:680-700 RPM
Range: 300m ( 500 w/ optics)
Last edited by Lazssia on Tue Dec 13, 2011 2:06 pm, edited 3 times in total.

User avatar
Kouralia
Post Marshal
 
Posts: 15140
Founded: Oct 30, 2011
Democratic Socialists

Postby Kouralia » Thu Dec 15, 2011 4:24 am

Lazssia wrote:Not sure if you're still paying attention to this thread Kour, but though I'd post one of my new pieces.
(Image)
Action: Gas Operated, Rotating Bolt.
Weight: 3.? Kg
Length:?
Barrel Length:?
Cartridge:6.8 SPC
Rate of Fire:680-700 RPM
Range: 300m ( 500 w/ optics)


I'm still here, just a quick lapse of consciousness or something like that...

That's a very good rifle, for a modification. The only thing I'd say that stands out would be that generally rifles try to have rails connected so that gap between the two rail sections is slightly out of place.
Kouralia:

User avatar
The British Antarctic Colonies
Secretary
 
Posts: 27
Founded: Oct 19, 2011
Ex-Nation

Postby The British Antarctic Colonies » Sat Dec 17, 2011 3:01 pm

Kouralia, you've already seen this on my DeviantArt, but I present to everyone else the DeLisle Commando Carbine modified for use by BACA commandos and secret service.
Weapon:
Image

Stats and description
A BACA-modified version of the DeLisle Commando Carbine used by the British Army Commandos in World War two. The original was one of the quietest firearms ever designed. The BACA Small Arms Unit modified these for use by their special forces and operatives of the Secret Service for the maximum possible stealthiness, and so that it uses 9x19mm ammunition rather than .45 ACP. The magazine has been ergonomically designed at the bottom to aid removal.

Cartridge 9x19mm

Action: Bolt action
Rate of fire : 20–30 rounds/minute
Muzzle velocity: about 850 ft/s (260 m/s)
Effective range: 200 yd (185 m)
Maximum range : 400 yd (365 m)
Feed system : 7 or 11-round detachable magazine


The code for this weapon is on my DeviantART, TyrasEngineer, in my Scrapbook if you are interested in modifying it.
http://en.wikipedia.org/wiki/File:De_Lisle_Rifle.jpg<--- that's the one it's based off
Last edited by The British Antarctic Colonies on Sat Dec 17, 2011 3:03 pm, edited 1 time in total.

User avatar
Northern Dem Canada
Diplomat
 
Posts: 599
Founded: Mar 04, 2011
Ex-Nation

Postby Northern Dem Canada » Sat Dec 17, 2011 3:23 pm

Great guide, great job. Maybe this should go as a sticky somewhere.

Can you tell me what you think of this gun, I just made it a little while ago, haven't blended yet though.

Image


Ps, I realize that some of the parts are off, like the scope placement.
Last edited by Northern Dem Canada on Sat Dec 17, 2011 3:24 pm, edited 1 time in total.
Perseus Mandate Director
-
Come to my new storefront, one of the most realistic of its' type http://forum.nationstates.net/viewtopic.php?f=6&t=166225.
-
Proud Member of the International Criminal Police and Peacekeepers Organization
Deptartment of Weaponary President
ICCPO Recruiter
Motto: Live Free or Die Hard
In honor of trolls all over the world.
Reactivated and ready to kick some ass.

Next

Advertisement

Remove ads

Return to Factbooks and National Information

Who is online

Users browsing this forum: No registered users

Advertisement

Remove ads